Secure Messaging with Retroshare
YOU’LL NEED THIS RETROSHARE
Download this free, open- source software from www.retroshare.net.
A FRIEND
You need at least one similarly privacy or security conscious friend.
THESE DAYS, our privacy and security are constantly under attack, not just from foreign agencies or hackers, but even big business and government. If you’re looking for a way to keep your online communications private, Retroshare is one of the most secure options out there.
Retroshare describes itself as “a secure decentralized communication platform.” In layman’s terms, this means there are no central servers where sensitive information is stored; instead, Retroshare employs a variant of P2P technology it calls Friend-to-Friend (F2F). F2F enables you to build a private network of friends without anyone else-including your friends—knowing who’s in it.
Whatever your messaging needs, Retroshare has your back covered. Within a single application, you’ll find tools for instant messaging, private mail, secure P2P file sharing, and public and private chat channels. While the program isn’t completely anonymous—your identity enables your friends to see both who you are and what your IP address is—there are tools and channels you can access completely anonymously.
Perhaps Retroshare’s biggest fault is in trying to cram so much functionality into a single tool, which creates a cluttered and fussy interface, with useful settings buried away. But if that’s been putting you off, fret no more. We’ve dived in head first with the help of some friends to navigate its murky waters, and show you how to get started with your own private network. -nick peers

1 SET UP PROFILE AND FIRST NODE
Head to www.retroshare.net and download the latest Qt4 version, because it’s the same user interface found in the Mac and Ubuntu versions. Once downloaded, double-click the setup file and follow the prompts—you have the option of installing it as a regular application, or as a portable app.
>> Launch Retroshare, and create a new username and password [Image A]—the stronger the better. Keep moving your mouse randomly around the screen until the progress bar is at least 20 percent (but aim to reach 100 percent). Once you’re happy, click “Generate new profile and node.”
2 SWAP CERTIFICATES WITH A FRIEND
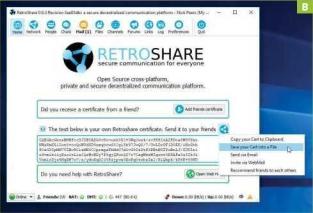
Close the welcome screen to view your Retroshare certificate—a lengthy string of alphanumeric characters and symbols. Click the Retroshare icon above it to reveal five different ways to make friends [Image B]. We’re assuming you’re following this tutorial with a friend, so choose one of the two ways to share your certificate: either via the clipboard (which you paste into another document or application), or a file. If you choose the “Save your Cert into a file” option, save it with a *.rsc file extension, then transfer it securely to your friend—either physically (via USB flash drives, say, or even a printout), over a local network share, or perhaps via another secure messaging platform, such as PGP-encrypted email.
3 MAKE CONNECTION
Once you’ve received it, click “Add friends certificate.” You can type it in painstakingly by hand, paste it from your clipboard, or click “Open certificate” to open the certificate file they’ve shared with you. Click “Next,” and you’ll see it’s signed by the name of the person it purports to be from. If you’re not 100 percent convinced of the origin of the file, click “Finish.” But if you’re happy with its veracity, click “Show Advanced options,” and check “Authenticate friend (Sign PGP Key)” [Image C]. This adds your proof to the key that it’s genuine, to help others decide whether it’s safe or not. If you’ve decided to authenticate the key, you need to enter the password you created in step one after clicking “Finish.”

4 COMPLETE CONNECTION
A Connection Assistant opens, which sets up your network connection. When it’s online, it confirms you’ve reached your friend. You may need to prod your friend via their “Log” button to accept. When done, you’ll see a “Congratulations, you are connected” message. Click “OK,” then switch to the “Network” section, where they’re listed under “Friend Nodes.” Repeat for any other friends.
>> Go to the “Network” section and switch to the “Network graph” tab. You’ll see how you’re connected to your friends, but that they’re not (yet) connected to each other. This serves as a reminder of how Retroshare’s F2F network works: All connections are individual; you don’t simply gain access to another person’s set of friends.
5 LINK FRIENDS TOGETHER
Friends can—if they wish—connect directly, too. This is done via the “Add” button from the “Home” section. This time, choose “Recommend my friends to each other.” You need to check the boxes of those you wish to introduce in both “Recommend friends” and “To” [Image D]. Your friends then receive two messages in their Mail box, one directed to them, and the other where they’ve been CCed. They need to open the message directly addressed to them, where they’ll see the other person’s Retroshare certificate has been attached: Just click this to add it in the usual way.

6 WORKING WITH NODES

To use Retroshare on more than one computer, you need to transfer your profile. First, export it from your PC: Select “Network > Keyring,” right-click your profile entry, and choose “Export/create a new node,” then “Export selected key.” Save the .asc file and transfer it to your new computer.
Open Retroshare on the second device, and click “Option > Advanced options,” then “Option > Use existing profile.” Load in your .asc file. This pre-fills the profile name-give your node a name to differentiate it from your main PC, then enter your password, move the mouse about, and click “Go!”
By default, each node shares your name, PGP ID, and PGP fingerprint, but they’re assigned unique location IDs. Each node is-by default-isolated from the others, so you can choose who gets to contact you on each node. The quickest way to copy all your friends across is via the “Network” section. Right-click “Trusted nodes” (or a group name), and choose “Export friends list.” Transfer the exported file across, then re-import it into your new node from the same dialog.
TIPS AND TRICKS

As if Retroshare’s existing features weren’t enough, it’s possible to expand it further using plugins. Two are included with the Windows version, but are disabled by default. Navigate to “Preferences > Plugins,” and click “Enable” next to the VoIP.dll plugin to add voice and video chat to Retroshare’s “Network” button; enable FeedReader to set up an RSS feed for your own use or to share via a forum. Once enabled, configure both via their own sections in “Preferences” (in the case of the VoIP plugin, both you and your chat partner need it installed and running to use it).
Retroshare comes with a built-in web interface, giving you access to a limited subset of its features through your web browser. Navigate to “Preferences > Webinterface” to enable it. By default, you’re limited to access through the computer Retroshare is installed on; check “Allow access from all IP addresses,” and you can then access it from other computers on your local network using their IP address, and the designated port—for example, 192.168.0.3:9090.
REVIEW CONNECTIONS
Once your friends are connected to each other, switch to the “Keyring” tab under “Network” to review all the keys you’ve received-look at the Trust level. “Personal signature” refers to the fact you received the certificate directly from them, while “Untrusted peer” indicates you connected through a third-party introduction.
>> If you’re confident the person is who they appear to be, right-click their profile, and choose “Profile details.” You’ll see a list of people who have signed the key, plus a “Trust level” drop-down menu-click this to indicate your confidence in this person. If you trust them implicitly, click “Sign this key” if you haven’t already done so-when you then introduce them to other people, they’ll see that you’ve signed their certificate, too, indicating they’re genuine.
7 USE RETROSHARE FOR CHAT AND MESSAGING
The “Network” tab doubles up as Retroshare’s instant messaging client. Double-click a person in the left- hand window to open a message window, then use the tools to chat with them. It works in a similar way to Skype and other IM tools: chat, add smileys, swap photos and files, and so on. You can search your chat history, plus save, clear, or delete it [Image E]. You can also send a message to everyone currently online in your nodes list using the “Broadcast” tab. Type a message, and it appears in the “Broadcast” tab.
>> Right-click a person’s name, and you’ll see various options, including one for organizing them into groups. Several presets—co-workers, family, favorites, and so on—are provided, or you can create your own. This option enables you to name your group, plus quickly file people into it. You’ll then see people filed accordingly in the list.
>> Switch to the “Mail” section, and you’ll see that Retroshare can also be used as a private email service

between you and your contacts. It works in much the same way as regular email, with messages held until you’re both online and logged into Retroshare, at which point they’re delivered.
8 SHARE FILES SECURELY
Another use for Retroshare is as a P2P file-sharing tool. Switch to the “Files” section. Click “Configure shared directories” to edit the default directory (where files you download from others appear), and add more. Click “Add new” to select (or create) your new shared directory. Double-click “[Unset]” under “Visible name” to give it a name that others will see when browsing the “Friends files” tab of their “Files” section.
The default settings for file searching (no anonymous searches) and downloading (using anonymous tunnels) are best left alone. Note that content isn’t visible to your contacts unless you double-click the green button. By default, all can now view it, so right-click “[All friend nodes],” and choose “Change group visibility” to make it visible only to a subset of your contacts using the groups from the previous step. You can set up multiple shared folders with different access controls for each-click “Apply and close” when done.
>> Now simply copy files into this folder and other users can download them via the “Friends files” tab. Use the “My files” tab to review what you’re sharing; expand the shared directory name to view the contents of the directory. It can take a little while for new files to appear—click “Check files” to force a refresh of the view. You can also group files into “collections”—this is a simple file you can distribute to others. When they click on the collection, the files listed in it are automatically downloaded into the same folder structure you’ve set up inside the collection.
>> If you encounter sluggish Internet speeds because too many people are grabbing your files, go to “Preferences > Network” to set a universal bandwidth limit for uploading files, or right- click a contact and choose “Profile details > Options tab” to set restrictions at an individual level. Keep an eye on the “Down” and “Up” levels in the bottom right-hand corner of the main Retroshare window to see what’s going on.
9 BUILD IDENTITIES
Switch to the “People” section, where you create profiles to identify yourself in other parts of Retroshare. Use the “Person” tab to view your own identity as it’s seen by others you’re connected to. Right-click it and choose “Edit identity” to modify it— change your nickname and set your avatar or photo.
>> You can also create new identities that sit alongside your existing ones—to do so, click the “+” button next to the “Search Persons” box, and choose “Create new Identity.” By default, the identity is “owned” by you, so while you provide a nickname and avatar, your profile details are also available for others to see. You can also create completely anonymous “pseudonyms”—provide a


nickname and an avatar, but relax in the knowledge there’s nothing to link them back to your own profile.
10 ADD TO CIRCLES
By default, other people’s identities don’t appear under “People.” You can rectify this by way of the Circles feature. First, click “+” and choose “Create new circle.” Give your circle a suitable name, and leave it set to “Public”—this ensures your contacts (but no one else) will be able to see you and your new circle in their “People” section. Select an identity linked to your profile in the right- hand pane, and click “<” to add it to the list of invitees, then click “Create.”
>> Now switch to the “Circles” tab, and expand “Other circles.” Expand your circle, right-click your name, and choose “Accept this invitation” to join the circle. It now moves to the “Circles I belong to” section, and both the circle and your contacts will now be able to see your identity. They can now right-click the circle and choose “Request subscription.” If you accept their request via the “Circles “tab (when their name appears, right-click, and choose “Grant membership”), they’ll show up in your “People” list, too [Image F].
11 AND THERE’S MORE
Set up private chat rooms via the “Chats” button — click “+” to set one up. You can choose an identity to use, whether it’s public (all your friends) or private (invitation-only), and ban pseudonyms (check “Required PGP-signed identities”). Chat rooms work much like the one-to-one instant messaging tool, only for larger groups.
>> Retroshare also offers Channels—a mechanism for spreading data around your network. The channel’s creator is the only person who can post to the channel, but others can download your content, and you can enable comments, too. Note that public channels go beyond your friend network—stick to circles or node groups to limit who has access.
>> Forums work in the same way as regular Internet forums, except everything is, of course, encrypted and decentralized. Links are another variation on the same theme. In short, we’ve barely scratched the surface of what Retroshare can do. It’s incredibly flexible, with each section packed full of hidden tips and tricks—click “Preferences,” and work through the sections to discover even more tweaks and settings to apply [Image G]. Head over to https://retroshare.readthedocs.io/en/latest/user- guide/interface and work your way through the various sections, where you’ll gain advanced insights into features we’ve covered, plus learn about the other sharing tools that we’ve only touched upon.
Installed Retroshare and 5 keys. Chatted with 1 friend. Bitdefender scanned the software and quarantined the program as infected with atc4.detection virus (a false positive). I restored the quarantined files but Retroshare will not run.
Infected file detected
13 minutes ago
Feature:
Antivirus
The item c:\users\cadd graphics\appdata\roaming\retroshare\loc06_c9db6596862423487864803443ef3551\bdfilter.txt was restored at user request.